Monday, November 28, 2011

Different editions of SQL 2008


Different editions of SQL Server 2008 :
  • Enterprise Edition
    Data management and business intelligence platform providing enterprise class scalability, high availability, and security for running business-critical applications
  • Standard Edition
    Data management and business intelligence platform providing ease of use and manageability for running departmental applications
  • Workgroup Edition
    Data management and reporting platform providing secure, remote synchronization, and management capabilities for running branch applications
  • Developer Edition
    May be installed and used by one user to design, develop, test, and demonstrate your programs on as many systems as needed
  • Web Edition
    A low-TCO, scalable, and manageable database option for web hosters and end customers looking to deploy publicly facing web applications and services
  • Express Edition (FREE)
    A free edition of SQL Server ideal for learning and building desktop and small server applications and for redistribution by ISVs
  • Compact Edition (FREE)
    A free, SQL Server embedded database ideal for building stand-alone and occasionally connected applications for mobile devices, desktops, and web clients
  • Evaluation Edition (Temporary FREE)
    This edition may be installed for demonstration and evaluation purposes until an expiration period of 180 days.

Tuesday, November 08, 2011

Next line in a cell in Excel


As it sounds very easy, but if you are visiting this page, you know it is not that easy as it sounds ;-) Usually in such cases Shift+Enter is the right combination, but strangely Microsoft use that for another operation in Excel and instead uses Alt + Enter. Hold Alt key down and press enter.

Wednesday, October 26, 2011

Thumbnails not showing on Windows Explorer, windows server 2008


  • Start button 
  • click Run
  • Enter SystemPropertiesPerformance
  • Click OK
  • Inside Performance Options window check the Show thumbnails instead of icons
You're done :-)

Photo Gallery Viewer on Windows Server 2008

If you are suffering lack of Photo Gallery Viewer after installing Windows Server 2008, then you need to read the following. It's easy to install this feature, and it can be easily done by installing the "Windows desktop experience" from the Server Manager -> Features -> Add Feature. This package includes the Windows Photo Gallery viewer as well.

Thursday, October 20, 2011

Enable Wireless Networking on MS Windows Server 2008


Start -> All Programs -> Administrative Tools -> Server Manager

Choose Features in Service Manger and then choose the check-mark beside Wireless LAN Service and click Next. Later you need to click install and you are done. Wireless networking is now installed on your Windows Server 2008.

OBS : Bear in mind that using wireless services is not as secure as cable and therefore deactivated.

Monday, October 17, 2011

Adding up all values in a column in Excel

To add up all the values from one Excel column in one cell, we only need to do this :


  • click on the cell
  • Write =SUM(COLUMN:COLUMN)
E.g. in following example it is =SUM(B:B), because my numbers are in column B.


Thursday, September 08, 2011

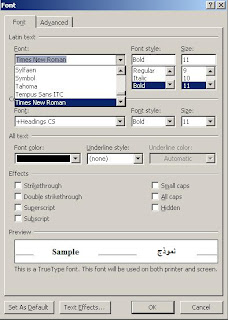
Changing the default font of a document at MS Word 2010


  1. Click on the expansion sign beside the Font panel on your tool bar.
  2. Choose your favorite font for this document and click OK for the changes to effect JUST this document, or Save it as default, for the changes to apply to all future documents.


Thursday, September 01, 2011

How to make a picture background transparent in GIMP


  1. Open the file
  2. Layer -> Transparency -> Add Alpha channel
  3. Choose Fuzzy Selector and try to remove the area you want to make transparent by selecting it and pressing DELETE button on keyboard or through the menu by clicking Edit -> Clear.
  4. Your image now is transparent in those areas that you have taken away.

Sunday, August 07, 2011

Error importing SQL database in Wordpress

If you get; CREATE TABLE IF NOT EXISTS ; error, when you try to import your SQL backup into your newly installed Wordpress, then you just need to export your database again(at your old PhpMyAdmin section) and while doing it, dont forget to tick DROP all WordPress tables, when you export your SQL database.

Restoring SQL database in your new wordpress

  1. You make a back up file of your SQL database from your Cpanel -> PhpMyAdmin -> Export*** You need to DROP all WordPress tables in your database to make room for the restore(This is a check box when you are exporting your DB).
  2. You upload the file in your new hosting plan/new website on your Cpanel -> PhpMyAdmin -> Import
  3. Blank page ??? Check your themes. Faulty theme can cause blank page. Try changing to another theme.

Tuesday, May 24, 2011

Disable Taskbar Thumbnail Preview in Windows 7; HOWTO

1. Start button -> type on search bar gpedit.msc & Enter
2. Go to User Configuration, Administrative Templates, and Start Menu and Taskbar
3. Fina “Turn off Taskbar Thumbnails” and open it.
4. Select Disable from the opened window
5. Done :-)

Tuesday, April 19, 2011

start jFrame in the center of the screen


// Get the size of the screen
    Dimension dim = Toolkit.getDefaultToolkit().getScreenSize();
    
    // Determine the new location of the window
    int w = window.getSize().width;
    int h = window.getSize().height;
    int x = (dim.width-w)/2;
    int y = (dim.height-h)/2;
    
    // Move the window
    window.setLocation(x, y);

Monday, April 18, 2011

Integrating power of Java & Processing :-)

In the following link you can find how to import processing libraries to a Java class where you can combine the power of Java with the flexibility of Processing and make miracles ;-)

http://processing.org/learning/eclipse/

Source : Processing.org

Saturday, March 12, 2011

"Fatal error: Call to undefined function" after automatic upgrade in Wordpress

"Fatal error: Call to undefined function" is always a sign of an incomplete upgrade, where not all the files got upgraded.

Thursday, March 10, 2011

Live USB of different Linux distributions in Windows, HOWTO

Universal USB Installer, is a very easy tool to do this. Manual :

  1. Insert a USB stick with at least 2GB of free space
  2. (Optional) You can download the iso file of the Linux distro that you want to have it on your USB / The download can be done through the Universal USB Installer later as well.
  3. Download the Universal USB Installer (Both Download link & user manual)
  4. Select the desired Linux distro from the dropdown list
  5. Click 'Browse' and open the downloaded ISO file/ OR simly download it by clicking on the "Download iso(optional)"
  6. Choose the USB drive and click 'Create'

    Thursday, March 03, 2011

    Android & WiFi information, Wifimanager + Wifiinfo

    For having access to the WiFi connection, you can use the WifiManager and WifiInfo classes in Android SDK. The following code can show you how you can do get access to things like your IP address, the connected network name or the available networks around you :

            WifiManager myWifiMananger = (WifiManager) getSystemService(WIFI_SERVICE);
    
            WifiInfo myNetInfo = myWifiMananger.getConnectionInfo();
    
            showIp.append(changeIp(myNetInfo.getIpAddress()) + " \n");
    
            showIp.append(myNetInfo.getSSID() + " ");
    
            List<ScanResult> scanList = myWifiMananger.getScanResults();
    
            for(ScanResult element : scanList){
    
             showIp.append(element.SSID + " Level: " + element.level + " freq : " + element.frequency + " Cap: " + element.capabilities + "\n");
    
            }
    //DONT forget that the getIpAddress returns an int value. Convert it to string :
    public String changeIp(int ipAddress){
    
         return String.format("%d.%d.%d.%d",
    
           (ipAddress & 0xff),
    
           (ipAddress >> 8 & 0xff),
    
           (ipAddress >> 16 & 0xff),
    
           (ipAddress >> 24 & 0xff));
    
        }


    *** VERY IMPORTANT : To use this you need to add couple of lines to android manifest(XML file -> AndroidManifest.xml).

    <uses-permission android:name="android.permission.ACCESS_WIFI_STATE" />
    
      <uses-permission android:name="android.permission.CHANGE_WIFI_STATE" />
    

    Sunday, February 27, 2011

    Outlook backup

    The following procedure is valid only for Microsoft Office Outlook 2007. You can determine which version you are using by opening Outlook and clicking on Help > About Microsoft Outlook.

    The Personal Folder file (.pst / PST) is the place where Outlook stores its data (when you're using Outlook without Microsoft® Exchange Server). Each Personal Folder file contains all of your Outlook folders, including the Inbox, Calendar, and Contacts. You may have a single .pst file (usually called "Internet Folders" or "Personal Folders" in your Folder List), and you may also have an additional .pst file that you use to archive messages (named "Archive Folders"). By backing up these PST files you will be backing up all your Outlook information.

    In previous versions of Outlook, it was difficult to locate the folder containing the personal folder files. Developers have made this task much easier in Outlook 2007.

    There are two ways to access the location of your data files. In the main menu, you can either click File > Data File Management... or Tools > Account Settings...

    If not already selected, click on the "Data Files" tab. You may have a single data file or multiple data files. These "Data Files" are where you store your email messages, calendar, tasks and other items.


    Highlight the data file that you are interested in backing up and click on the "Open Folder..." icon. Clicking on this icon will automatically launch Windows Explorer and take you to the location where this data file is stored.

    Within the folder you should find an outlook.pst file . Burn this file to a CDROM disk or other backup source. If you archive your email, be sure to backup the archive.pst file as well. Prior to backing up these files, Outlook will need to be closed.
    The table below lists key Outlook files that you may want to back up in addition to your Personal Folder(s). You will need to completely exit Outlook prior to copying these files. Depending upon your configuration some or all of these files may be present in your Outlook directory.

    Wednesday, February 23, 2011

    Change product key in Office 2010; HOWTO

    1. Control Panel
    2. Uninstall a Program / Programs & features
    3. Office 2010
    4. Click on Change button
    5. Choose Enter new product key & Press Continute
    6. Type your new product key and also make sure to check the option Attempt to automatically activate my product online to automatically activate your Office 2010 suite. Now click on Continue and then on Install Now.

    Tuesday, February 15, 2011

    Convert array of strings to a list, C#

    It is very easy to convert an array of string to a list in C-sharp :


    // this line returns an array of file names
    string[] fileEntries = Directory.GetFiles("c:/test");
    List fileList = new List(fileEntries.Length);//convert an array to List

    Sunday, February 13, 2011

    Ignite Oslo, Rapid Prototyping

    On Thursday I hold one of the most difficult presentations of my life. I was representing Robotica Osloensis, a student community which I am deputy chairman of, at Ignite Oslo. I talked about Rapid Prototyping which we use as our main method at Robotica in our projects. Ignite is a style of presentation where participants are given five minutes to speak on a subject accompanied by 20 slides. Each slide is displayed for 15 seconds, and slides are automatically advanced. The Ignite format is similar to Pecha Kucha, which features 20 slides displayed for 20 seconds each.
    The Ignite Oslo was a very nice event. They had 5 minutes presentations about different topics(list over topics) which were very interesting. Presentations about art, film making, music composition with applications on iPad, 3D printing, air balloons and fashion, etc. It was pretty stressful when it came to my turn. The whole idea of 15 seconds intervals and having a lot to say about a subject that actually belongs to the nerd world made me very nervous. Thanks to my friends Magnus Lange and Ole Jacob, who helped me both about the content and preparing in advance for the presentation, I was well prepared. Also I should thank my friends who came there to support me when I was actually holding the presentation. My presentation can be downloaded by clicking here.


    Friday, January 14, 2011

    Import your Facebook events to your Google Calender

    Go to your Facebook account, Go to Events, Click on Export Events -> You would get a link
    Then go to your Google Calender -> Setting -> Calender Setting -> Calenders -> import calender link in the middle of the page. There you can use the Link you received from Facebook to import the events to your Google calender.

    Category 5, cable standard

    Category 5 cable (Cat 5) is a twisted pair high signal integrity cable type. This type of cable is used in structured cabling for computer networks such as Ethernet and ATM, and is also used to carry many other signals such as telephonyand video. Most Category 5 cables are unshielded, relying on the twisted pair design for noise rejection. Category 5 has been superseded by the Category 5e specification.


    I usually use these cables in my robotic projects as well, as they come in a well packaged easy way and one can easily setup one protocol to use one color for one kind of signal :-)

    Thursday, January 13, 2011

    String & Javascript

    String in Javascript, cool link : http://www.javascriptkit.com/javatutors/string4.shtml

    Javascript, forward to another page according to the refferer URL

    <!-- Hide script from old browsers<br>

    if (document.referrer.indexOf("facebook") != -1)
    //document.write("From facebook")
    location.href = "www.yourpage.com";
    else
    document.write("Not from facebook so we stay on this page")
    //-- Stop hiding script -->

    Monday, January 10, 2011

    KeyListener in Java

    If you want to write a code in Java which is based on keys being pressed on keyboard, then KeyListener is your way a head. This link at Oracle.com has a very nice description of the whole class and a very good example :

    http://download.oracle.com/javase/tutorial/uiswing/events/keylistener.html

    Friday, January 07, 2011

    HOWTO : add/remove a String Item to jComboBox, Java

    jComboBox :
    // Add an item to the start of the list
    cb.insertItemAt("item0", 0);
    
    // Add an item after the first item
    cb.insertItemAt("item0.5", 1);
    
    // Add an item to the end of the list
    cb.addItem("item3");
    
    // Remove first item
    cb.removeItemAt(0);
    
    // Remove the last item
    cb.removeItemAt(cb.getItemCount()-1);
    
    // Remove all items
    cb.removeAllItems();
    

    HOWTO : get a list of available ports, Java

    If you want to ahve a list over all ports, the code down here can help alot
    protected void list() {
    // get list of ports available on this particular computer,
    // by calling static method in CommPortIdentifier.
    Enumeration portList = CommPortIdentifier.getPortIdentifiers();
    
    // Process the list.
    while (portList.hasMoreElements()) {
    CommPortIdentifier cpi = (CommPortIdentifier) portList.nextElement();
    System.out.print("Port " + cpi.getName() + " ");
    if (cpi.getPortType() == CommPortIdentifier.PORT_SERIAL) {
    System.out.println("is a Serial Port: " + cpi);
    } else if (cpi.getPortType() == CommPortIdentifier.PORT_PARALLEL) {
    System.out.println("is a Parallel Port: " + cpi);
    } else {
    System.out.println("is an Unknown Port: " + cpi);
    }
    }
    }
    

    Source : java2s.com, modified as javax.comm does not exist anymore on Windows and RxTx should be used

    Thursday, January 06, 2011

    HOWTO : The code which lets you share a link on Facebook on your website

    If you want to share the link of a current page on your website or a permanent link on Facebook, you just need to do the following :

    Facebook has a very good documentation on it which you can read here.

    </SCRIPT> <a name="fb_share" type="button"></a> <script src="http://static.ak.fbcdn.net/connect.php/js/FB.Share"
    type="text/javascript">
    </script>

    Result :

    Wednesday, January 05, 2011

    HOWTO : change the location of Desktop folder at Windwos 7

    If like me you would also like to change the location of your Desktop folder(security reasons or willing to share the same Desktop on all of your computers), keep reading.


    The solution is pretty simple :-) Simply go to following path : 
    C:/users/name/Desktop
    Then right click on the Desktop folder and then choose properties. After it click on "Location tab" and there you can change the location of the Desktop folder.


    in XP, it is the same story but a little bit more complicated as you should go to registery(Start->Run->regedit) and change the value of this entry in registry : 


    HKEY_CURRENT_USER\Software\Microsoft\Windows\CurrentVersion\Explorer\Shell Folders\Desktop

    HOWTO : insert a code in blogspot weblogs


    <"border: 1px dashed rgb(153, 153, 153); padding: 5px; overflow: auto; font-family: Andale Mono,Lucida Console,Monaco,fixed,monospace; color: rgb(0, 0, 0); background-color: rgb(238, 238, 238); font-size: 12px; line-height: 14px; width: 100%>
    
    
    Some code here

    Monday, January 03, 2011

    HOWTO : Add a program to Applications Menu

    In Gnome(edgy) : System -> Preferences there is an item called "Main Menu". Here you to edit the application menu.

    HOWTO : Find out if you have a 64 bit Ubuntu or a 32 bit one ?

    Simply open a terminal and write the following command :

    uname -m
    x86_64 = 64 bit
    i686 = 32 bit

    Sunday, January 02, 2011

    Setting limitation on uploading file, PHP

    You can always set limitations on the uploading process as it is a big security risk to let users upload whatever they like ...
    <?php
    if ((($_FILES["file"]["type"] == "image/gif")
    || ($_FILES["file"]["type"] == "image/jpeg")
    || ($_FILES["file"]["type"] == "image/pjpeg"))
    && ($_FILES["file"]["size"] < 20000))
      {
      if ($_FILES["file"]["error"] > 0)
        {
        echo "Error: " . $_FILES["file"]["error"] . "<br />";
        }
      else
        {
        echo "Upload: " . $_FILES["file"]["name"] . "<br />";
        echo "Type: " . $_FILES["file"]["type"] . "<br />";
        echo "Size: " . ($_FILES["file"]["size"] / 1024) . " Kb<br />";
        echo "Stored in: " . $_FILES["file"]["tmp_name"];
        }
      }
    else
      {
      echo "Invalid file";
      }
    ?>
    

    More detailed types of files : 
    "application/pdf" - PDF Files
    "application/msword" - MS Word Files
    "application/powerpoint" - MS Powerpoint Files
    "application/excel" - MS Excel Files
    "text/plain" - Text Files


    Source : W3Schools

    Uploading a file, PHP

    With PHP you have the power to upload files to the server.


    An example code(The client side) :
    <html>
    <body>

    <form action="upload_file.php" method="post"
    enctype="multipart/form-data">
    <label for="file">Filename:</label>
    <input type="file" name="file" id="file" />
    <br />
    <input type="submit" name="submit" value="Submit" />
    </form>
    </body>
    </html>


    In the HTML code above :

    • The enctype attribute of the tag specifies which content-type to use when submitting the form. "multipart/form-data" is used when a form requires binary data, like the contents of a file, to be uploaded
    • The type="file" attribute of the input tag specifies that the input should be processed as a file. For example, when viewed in a browser, there will be a browse-button next to the input field

    ****
    An example for the "server side" script

    The "upload_file.php" file contains the code for uploading a file:

    <?php
     if ($_FILES["file"]["error"] > 0)
      {
      echo "Error: " . $_FILES["file"]["error"] . "<br />";
      }
    else
      {
      echo "Upload: " . $_FILES["file"]["name"] . "<br />";
      echo "Type: " . $_FILES["file"]["type"] . "<br />";
      echo "Size: " . ($_FILES["file"]["size"] / 1024) . " Kb<br />";
      echo "Stored in: " . $_FILES["file"]["tmp_name"];
      }
    ?>


    By using the global PHP $_FILES array you can upload files from a client computer to the remote server.

    The first parameter is the form's input name and the second index can be either "name", "type", "size", "tmp_name" or "error". Like this:


    • $_FILES["file"]["name"] - the name of the uploaded file
    • $_FILES["file"]["type"] - the type of the uploaded file
    • $_FILES["file"]["size"] - the size in bytes of the uploaded file
    • $_FILES["file"]["tmp_name"] - the name of the temporary copy of the file stored on the server
    • $_FILES["file"]["error"] - the error code resulting from the file upload

    This is a very simple way of uploading files. You better add restrictions on what the user is allowed to upload to your sever. Down here you can also see a code which saves the uploaded file to a physical place on server. If you do not save the file, the temporary file will be deleted after the script ends. It also checks if the file already exist.


    <?php
    if ((($_FILES["file"]["type"] == "image/gif")
    || ($_FILES["file"]["type"] == "image/jpeg")
    || ($_FILES["file"]["type"] == "image/pjpeg"))
    && ($_FILES["file"]["size"] < 20000))
      {
      if ($_FILES["file"]["error"] > 0)
        {
        echo "Return Code: " . $_FILES["file"]["error"] . "<br />";
        }
      else
        {
        echo "Upload: " . $_FILES["file"]["name"] . "<br />";
        echo "Type: " . $_FILES["file"]["type"] . "<br />";
        echo "Size: " . ($_FILES["file"]["size"] / 1024) . " Kb<br />";
        echo "Temp file: " . $_FILES["file"]["tmp_name"] . "<br />";
        if (file_exists("upload/" . $_FILES["file"]["name"]))
          {
          echo $_FILES["file"]["name"] . " already exists. ";
          }
        else
          {
          move_uploaded_file($_FILES["file"]["tmp_name"],
          "upload/" . $_FILES["file"]["name"]);
          echo "Stored in: " . "upload/" . $_FILES["file"]["name"];
          }
        }
      }
    else
      {
      echo "Invalid file";
      }
    ?>


    Source : W3Schools