Finally after a long delay because of my exams the Shahabinary dictionary alpha version 0.001 probably full of non discovered bugs with very little amount of words is ready to download for coders. This dictionary is coded in Java and is a open source free Norwegian to English dictionary. I hope this is my first step toward the next better versions of this dictionary specially from Norwegian to Persian and the other way.
Click HERE to download.
Wish me luck and enjoy...
Shahab.
Tuesday, January 06, 2009
How to make an iterator for a Hashmap in Java
Iterate through the values of Java HashMap example :
Saturday, December 20, 2008
Install flash player on ubuntu
Q. How do I install Flash Player for Firefox web browser under Ubuntu Linux?
A. First, close running Firefox.
Open the terminal (shell prompt)
Type the following command to install flash player:
$ sudo apt-get install flashplugin-nonfree
Now flash player should be working. Visit youtube or any other site to view flash content.
Troubleshooting tip
Update: This issue only relevant to older Ubuntu Linux version such as 6.04.
Some people may find voice is not working with newly installed flash player. Type following commands to solve this problem (thanks to macewan.org):$ sudo apt-get install alsa-oss
$ gksudo gedit /etc/firefox/firefoxrc
Find line that read as FIREFOX_DSP and set to:FIREFOX_DSP="aoss"
Save and close the file.
Close Firefox and restart it again.
Click here to see the source.
Monday, December 01, 2008
Linux on USB memory stick
Now you can have your Linux on your USB memory stick and go around, boot different computers with your memory stick without installing or changing whatever crap(WINDOWS) on that computer which is not yours or for whatever reason you can not install Linux on it. There is a piece of software development called Unetbootin which makes this dream come true and with this piece of very handy technology, you just do not boot the system BUT makes changes that you can carry it around on your USB stick :-)
Ubuntu 8.10 offers a way to create a USB drive from the Live CD or an .iso. The question is, how well does this really work. In order to test we created several of these USB drive installs. The first thing to note is that the process is easy to do. Here is a step by step in create a USB Pen Drive disk.
The following Linux distributions are supported by Unetbootin:
- Ubuntu, Kubuntu, Xubuntu
- Debian
- Linux Mint
- opensuse
- Arch Linux
- Damn Small Linux
- Slitaz
- Puppy Linux
- FreeBSD
- NetBSD
- Fedora
- PCLinuxOS
- Gentoo
- Zenwalk
- Slax
- Dreamlinux
- Elive
- CentOS
- Mandriva
- FaunOS
- Frugalware Linux
Ubuntu 8.10 offers a way to create a USB drive from the Live CD or an .iso. The question is, how well does this really work. In order to test we created several of these USB drive installs. The first thing to note is that the process is easy to do. Here is a step by step in create a USB Pen Drive disk.
Insert the USB Pen Drive once you have booted the Live CD. Now go to System/Administration and Create USB startup disk in the menu. You will see it has detected the 2 GB San Disk. You can use as small as 1 GB for the disk. You will also need to indicate the location of the Live CD or an .iso so the system can build the disk. Here we used the Live CD.
It provides you with the option to decide how much free space to allow for files that you create. What this does is give you a way to move this Pen Drive from computer to computer and save your files. A mobile Pen Drive.
Installation process is quick.
News source (NORWEGIAN) : http://www.hardware.no/artikler/kjor_linux_fra_minnepinnen/58108
Tutorial Source : http://beginlinux.wordpress.com/2008/11/18/ubuntu-810-usb-drive-review/
Tuesday, November 11, 2008
VLC doesn't show subtitle automaticly under Linux
The thing is this, the avi file can be played by VLC media player and if you have the subtitle file (.srt) in the same folder with the same name beside the avi file then it should be read by VLC media player automaticly. But not always, for example mine under Linux refused to add it to the movie. Here is the way to do it manualy :
You click on open file, you specify the video file, then you click on use subtitle file, and then specify the subtitle file, it does not have to have the same name, as long as you specify the correct path
also, the subtitles file might be wrong, try to open it with a text editor and check its contents.
also try opening another subtitles, just to make sure that the subtitles file is not corrupted/worng.
Source that helped me : http://ubuntuforums.org/archive/index.php/t-803063.html
Monday, November 10, 2008
How to set JAVA_HOME variable
Q : I just need a help to show me how to setup java path on Linux. How can I set JAVA_HOME and PATH variables for every user under my Linux system?
A : ~/.bash_profile is a startup script which generally runs once. This particular file is used for commands which run when the normal user logs in. Common uses for .bash_profile are to set environment variables such as PATH, JAVA_HOME, to create aliases for shell commands, and to set the default permissions for newly created files.
A : ~/.bash_profile is a startup script which generally runs once. This particular file is used for commands which run when the normal user logs in. Common uses for .bash_profile are to set environment variables such as PATH, JAVA_HOME, to create aliases for shell commands, and to set the default permissions for newly created files.
Set JAVA_HOME / PATH for single user
Login to your account and open .bash_profile file$ vi ~/.bash_profile
Set JAVA_HOME as follows using syntax export JAVA_HOME=export JAVA_HOME=/usr/java/jdk1.5.0_07/bin/java
Set PATH as follows:export PATH=$PATH:/usr/java/jdk1.5.0_07/bin
Save and close the file. Just logout and login back to see new changes:$ echo $JAVA_HOME
$ echo $PATH
Tip: Use the following command to find out exact path to which java executable under UNIX / Linux:$ which java
Please note that the file ~/.bashrc is similar, with the exception that ~/.bash_profile runs only for Bash login shells and .bashrc runs for every new Bash shell.
Set JAVA_HOME / PATH for all user
You need to setup global config in /etc/profile OR /etc/bash.bashrc file for all users:# vi /etc/profile
Next setup PATH / JAVA_PATH variables as follows:export PATH=$PATH:/usr/java/jdk1.5.0_07/bin
export PATH=$PATH:/usr/java/jdk1.5.0_07/bin
Save and close the file.
Source : http://www.cyberciti.biz/faq/linux-unix-set-java_home-path-variable/
Friday, November 07, 2008
Schematic Diagrams, DC circuits
 This is a source of emf (electromotive force), with a voltage of
  , measured in units of volts, V. The most common source you will see will be a battery.
 This is a resistance, measured in units ohms ohms,
  . Most often it will be a resistor. However, wires connecting parts of a circuit are really not resistance-free. We can model this real-life case by putting a 'resistor' in the circuit which has the same resistance as the wires would have. Thus the wires can still be considered resistance-free since their resistance is represented by an additional resistor.
 This is a capacitor, with capacitance C measured in units of farads, F. The perfect capacitor will have no resistance (or inductance; see next), and we will assume that this symbol represents such an ideal capacitor. If a capacitor is not ideal, that is, it has some resistance (or inductance) associated with it, then we can model this by putting a 'resistor' (or inductor) in parallel with the capacitor. This resistor (or inductor) will have the same resistance (or inductance) as the non-ideal capacitor.
 This is an inductor, with inductance L, measured in units of henrys, H. To model a non-ideal inductor in a circuit (an inductor with an associated resistance or capacitance) we can put a resistor in series or a capacitor in parallel with the inductor. Giving these the same values as the inductor will represent an imperfect inductor.
--------------------------------------------------------------
1. Ohm's Law deals with the relationship between voltage and current in an ideal conductor. This relationship states that:
The potential difference (voltage) across an ideal conductor is proportional to the current through it.
The constant of proportionality is called the "resistance", R.
Ohm's Law is given by:
- V = I R
- I = g V
3. Ohm's Law can be used to solve simple circuits. A complete circuit is one which is a closed loop. It contains at least one source of voltage (thus providing an increase of potential energy), and at least one potential drop i.e., a place where potential energy decreases. The sum of the voltages around a complete circuit is zero.
4. An increase of potential energy in a circuit causes a charge to move from a lower to a higher potential (ie. voltage). Note the difference between potential energy and potential.
Because of the electrostatic force, which tries to move a positive charge from a higher to a lower potential, there must be another 'force' to move charge from a lower potential to a higher inside the battery. This so-called force is called the electromotive force, or emf. The SI unit for the emf is a volt (and thus this is not really a force, despite its name). We will use a script E, the symbol , to represent the emf.
A decrease of potential energy can occur by various means. For example, heat lost in a circuit due to some electrical resistance could be one source of energy drop.
Because energy is conserved, the potential difference across an emf must be equal to the potential difference across the rest of the circuit. That is, Ohm's Law will be satisfied:
= I RSource : http://www.physics.uoguelph.ca/tutorials/ohm/
Thursday, October 30, 2008
IRC chat, ubuntu
Xchat is a nice gui irc(Internet Relay Chat) client and may already be on your system. If not, you can get it with :
sudo apt-get install xchat
A text-based alternative irc client is irssi(homepage http://irssi.org/). You can get irssi with :
sudo apt-get install irssi
IRC is a good way to get help. The main Ubuntu support channel is #ubuntu on the irc.freenode.net irc network. There are other Ubuntu channels as well, including #ubuntu-offtopic (for social chat), #ubuntu+1 (for the dev ubuntu release), #ubuntu-effects (for beryp/compiz/xgl in ubuntu) and lots of Ubuntu channels for different languages.
Tuesday, October 28, 2008
Shahabinary Dictionary, My Project
Project name : Shahabinary Dictionary
Description : Norwegian - English Dictionary with spell-checking
Language : Java
Program Type : Open Source
Programming environment : Eclipse
supported O.S. : Linux / Windows
Comments, My Type :
I have a on going project which is a Norwegian to English dictionary with spell checker. The program is supposed to get the Norwegian word and then search in its database to find it and show the different meanings of one word within numbers that shows importancy.
The program is supposed to be intelligent enough to find out if a word has been entered with wrong spelling(misssing one character, replacing two characters, ...) and try to recover the mistake by giving a list of possible existing words from its database. My words database, right now and in the upcoming first version is not good at all and inholds around 4000 words. The Beta version will be available soon ...
Thursday, October 23, 2008
Change Login background, Ubuntu
GDM is controlled by themes..
see System -> Administration -> Login Window
you will find a lot of themes for login here :
http://art.gnome.org/themes/gdm_greeter/
see System -> Administration -> Login Window
you will find a lot of themes for login here :
http://art.gnome.org/themes/gdm_greeter/
Friday, October 17, 2008
Dividing C programs into files and run them with makefile
well¸ with my experience of large scale C programs(a Mobile Operative System that can send SMS), I would really recommend you to divide your program into files because without it you will just go officially nuts ...
How to Divide a Program between Several Files
Where a function is spread over several files, each file will contain one or more functions. One file will include main while the others will contain functions which are called by others. These other files can be treated as a library of functions.
Programmers usually start designing a program by dividing the problem into easily managed sections. Each of these sections might be implemented as one or more functions. All functions from each section will usually live in a single file.
Where objects are implemented as data structures, it is usual to to keep all functions which access that object in the same file. The advantages of this are;
*The object can easily be re-used in other programs.
*All related functions are stored together.
*Later changes to the object require only one file to be modified.
Where the file contains the definition of an object, or functions which return values, there is a further restriction on calling these functions from another file. Unless functions in another file are told about the object or function definitions, they will be unable to compile them correctly.
The best solution to this problem is to write a header file for each of the C files. This will have the same name as the C file, but ending in .h. The header file contains definitions of all the functions used in the C file.
Whenever a function in another file calls a function from our C file, it can define the function by making a #include of the appropriate .h file.
Organisation of Data in each File
Any file must have its data organised in a certain order. This will typically be:
1.A preamble consisting of #defined constants, #included header files and typedefs of important datatypes.
2.Declaration of global and external variables. Global variables may also be initialised here.
3.One or more functions.
The order of items is important, since every object must be defined before it can be used. Functions which return values must be defined before they are called. This definition might be one of the following:
*Where the function is defined and called in the same file, a full declaration of the function can be placed ahead of any call to the function.
*If the function is called from a file where it is not defined, a prototype should appear before the call to the function.
A function defined as
float find_max(float a, float b, float c) { /* etc ... ... */
would have a prototype of
float find_max(float a, float b, float c);
The prototype may occur among the global variables at the start of the source file. Alternatively it may be declared in a header file which is read in using a #include.
It is important to remember that all C objects should be declared before use.
Compiling Multi-File Programs
This process is rather more involved than compiling a single file program. Imagine a program in three files prog.c, containing main(), func1.c and func2.c. The simplest method of compilation (to produce a runnable file called a.out) would be
cc prog.c func1.c func2.c
If we wanted to call the runnable file prog we would have to type
cc prog.c func1.c func2.c -o prog
In these examples, each of the .c files is compiled, and then they are automatically linked together using a program called the loader ld.
Separate Compilation
We can also compile each C file separately using the cc -c option. This produces an object file with the same name, but ending in .o. After this, the object files are linked using the linker. This would require the four following commands for our current example.
cc -c prog.c cc -c func1.c cc -c func2.c ld prog.o func1.o func2.o -o prog
Each file is compiled before the object files are linked to give a runnable file.
The advantage of separate compilation is that only files which have been edited since the last compilation need to be re-compiled when re-building the program. For very large programs this can save a lot of time.
The make utility is designed to automate this re-building process. It checks the times of modification of files, and selectively re-compiles as required. It is an excellent tool for maintaining multi-file programs. Its use is recommended when building multi-file programs.
Using make with Multi-File Programs
We have already used make to build single file programs. It was really designed to help build large multi-file programs. Its use will be described here.
Make knows about `dependencies' in program building. For example;
*
We can get prog.o by running cc -c prog.c.
*
This need only be done if prog.c changed more recently than prog.o.
make is usually used with a configuration file called Makefile which describes the structure of the program. This includes the name of the runnable file, and the object files to be linked to create it. Here is a sample Makefile for our current example
# Sample Makefile for prog
#
# prog is built from prog.c func1.c func2.c
#
# Object files (Ending in .o,
# these are compiled from .c files by make)
OBJS = prog.o func1.o func2.o
# Prog is generated from the object files
prog: $(OBJS)
$(CC) $(CFLAGS) -o prog $(OBJS)
# ^^^ This space must be a TAB.
# Above line is an instruction to link object files
This looks cluttered, but ignore the comments (lines starting with #) andthere are just 3 lines.
When make is run, Makefile is searched for a list of dependencies. The compiler is involved to create .o files where needed. The link statement is then used to create the runnable file.
make re-builds the whole program with a minimum of re-compilation, and ensures that all parts of the program are up to date. It has many other features, some of which are very complicated.
For a full description of all of these features, look at the manual page for make by typing
man make
source
Wednesday, October 08, 2008
Makefile in Linux
Why Use a Makefile?
In any project you can have any number of source files. Now imagine having to recompile even the simplest of programs consisting of two source files, binarytree.c and mainprog.c. You will need to type the following command:
gcc -o outprogname binarytree.c mainprog.c
Now, since that mainprog.c files takes ages to compile, you don't want to recompile it everytime, the same goes for the binarytree.c file. Now imagine you had a hundred source files (think big, and then some more).
A Makefile makes this simple by allowing us to specify rules (consisting of dependencies and commands) to build our project.
4.2.2 A Simple Makefile Example
The following is a very simple, but complete Makefile:
outprogname : binarytree.o mainprog.o
gcc -o outprogname binarytree.o mainprog.o
binarytree.o : binarytree.c
gcc -c binarytree.c
mainprog.o : mainprog.c
gcc -c mainprog.c
Please note that the indented lines begins with a tab character.
In the case where both files needs to be compiled, make will issue three commands - yes this can be wasteful - namely:
gcc -c binaryproc.c
gcc -c binarytree.c
gcc -o outprogname binarytree.o mainprog.o
It is clear that these are the indented lines. You could have executed all of these commands by hand, if you were so inclined (programmers are known to be lazy), but typing make is easier. Now going on to dissect the above, a Makefile consists of a set of rules. Each rule consists of dependencies and commands. The lines with the colons in are dependencies and the lines that are tabbed in is commands. For each dependency, the commands required to bring the target - the file(s) before the colon - up to date follows it one the next line, indented with a tab character. The file(s) to the the right of the colon is the files on which the target relies, these are almost always used as input to the commands on the lines following the dependency.
It should be clear that the two rules at the bottom of the given Makefile produces .o files, created from the .c files (the -c flag tells gcc to compile the source file, but not link it). The topmost rule takes the two object files and links them together to create the final executable.
4.2.3 How Does make Determine Which Commands to Execute?
There are two reasons why make would decide a file needs to be made:
1. The file does not exist
2. The file is outdated
The first case is simple, the file does not exist - nuff said. The second case should be reasonably clear as well. Considering the simple Makefile above, edit binarytree.c. You would now like to compile outprogname. It relies on binarytree.o and mainprog.o. binarytree.o in turn relies on binarytree.c and mainprog.o on mainprog.c. You've just edited binarytree.c, so as you probably expect, binarytree.o is outdated and as a result so is outprogname. Make then goes ahead and first builds binarytree.o and then outprogname using the commands given.
A file is considered outdated if and only if:
* It is listed on the left of a colon
* A file on the right of that same colon is newer than that file
File "a" is considered newer than file "b" if its last modified time is more recent than file "b"'s.
4.2.4 Make Variables
Suppose you would like to use another C compiler, say cc. Now you can either replace gcc right through with cc, or you could have been smart and used variables. A make variable, as in any programming language, is simply a place holder for another value. You can create such a variable in a Makefile with a line such as:
cc=gcc
Actually, variables in make work very much like in bash scripting. So to actually replace the value of cc (which evaluates to gcc) just use ${cc}. Same people prefer using () instead of {}, but it doesn't matter which one you choose. Now let's asume that we would also like to be able to specify different levels of optimization as well as those debugging flags Derick has mentioned. We would need to specify the -O flags to the compile commands and the -g flag to all of them. Ok, so let's create two more variables: The first, called cflags, contains the flags we would like to pass to the compiler, and the second, called ldflags, contains the options we would like to pass to the linking command. The resulting Makefile will look something like:
cc=gcc
cflags=-O3 -g
ldflags=-g
outprogname : binarytree.o mainprog.o
${cc} ${ldflags} -o outprogname binarytree.o mainprog.o
binarytree.o : binarytree.c
${cc} ${cflags} -c binarytree.c
mainprog.o : mainprog.c
${cc} ${cflags} -c mainprog.c
4.2.5 Built-in Make Variables
Now I'm really lazy, and I mean that. So I'm aiming at reducing the size of my Makefiles even more (the previous step actually enlarged it, but it made mass adjustments easier - similar to constants in large programs). Also, I would like to keep the amount of debugging I've got to do in my Makefiles to a minimum. For these, and probably many others, make has a few built-in variables. I list a few of the useful ones, along with an explanation below:
Variable Description
$@ This will always expand to the current target.
$< The name of the first prerequisite. This is the first item listed after the colon. (binarytree.o in the first rule above)
$? The names of all the prerequisites that are newer than the target. In the above example this will evaluate to binarytree.o for the first rule.
$^ The names of all the prerequisites, with spaces between them. No duplicates
$+ Like $^, but with duplicates. Items are listed in the order they were specified in the rule.
4.2.6 Pattern Matching in Makefiles
As far as I know, this is a GNU extension, so if you plan to create very portable Makefiles, don't use it. In this case I suggest you use tools such as autoproject, automake, autoconf to build your Makefiles for you (Sorry M$ fans, but the configure scripts created by these tools doesn't work on Windows AFAIK).
As I mentioned above, I would like to get my Makefiles to be as short and compact as possible. Now, considering the variables mentioned above, take a look at:
binarytree.o : binarytree.c
${cc} ${cflags} -c $<
mainprog.o : mainprog.c
${cc} ${cflags} -c $<
Now I see a lot of repetition here. The only parts that differ here are the bases of the filesnames. Luckily, there is a way of compacting these two rules into one -- it's called pattern matching and has saved me quite a bit of time in my short lifetime. To use a pattern, you use % where you would like to actually match anything into it. For example, the above could be written as:
%.o : %.c
${cc} ${cflags} -c $<
Now that looks a lot simpler. In general, I have the following rule in all my Makefiles:
%.o : %.c Makefile
${cc} ${cflags} -c $<
Which is identical to the above, except that it forces a complete recompile each time I modify the Makefile. I do this so that if I change my Makefile, changes will take effect. For example, so I drop the -O3 flag from the cflags variable. Normally this would indicate that you would like the project to be recompiled without optimation
Also, it must be mentioned that it becomes possible to have two rules for the same target. I'm still not sure what make does in this case, but I suspect that both sets of commands gets executed.
4.2.7 Auto Dependencies
This is bordering on really advanced and I'm not always 100 % sure whether this works (according to the info pages it should, but it sometimes seems that the makefile.dep file doesn't get reloaded). Use with caution (even though you would definitely have the same problem without it).
In order to keep things simple, I often have a config.h file lying around somewhere (this is also a convention in the autoproject set of tools). Now if you change it you want all the files that includes it to be recompiled. Oh bugger, now which ones are those, since that other header file also includes it. Now, what if we we're to list every source file with all it's header files in a rule, and then all the header files with all the header files they include etc...
This will lead us back to where we began and it will probably be easiest to compile by hand again.
But as Derick mentioned, gcc has a -M switch, which will output exactly what we need. There are two variants of this switch: -M, which will list all header files included, including system header files, and -MM, which will only list header files included with the #include "..." directive and not those with the #include <...>
directive.
At this point in time, it is probably a good idea to mention that a rule does not need to have commands associated with it. The following is therefor a totally valid rule:
file.c : somefile.h anotherfile.h
As a matter of fact, this is excactly the type of rules that gcc -MM outputs. So we add The following to our Makefile
makefile.dep : *.[Cch]
for i in *.[Cc]; do gcc -MM "$${i}"; done > $@
include makefile.dep
Note the double $, this is because make uses $ as variable expansion, in this case we would like a single $ to be part of the command, and as in C/C++ with \, we simply put a double $ sign. For those not familiar with bash scripting, this command will execute a for loop, not unlike a for loop in programming, but using variable substitutions (as is available in PHP and Perl). The [Cch] is not unlike a ? in wildcard expansion, except that it will only match the characters C, c and h. This is called a glob expression. Strictly speaking * is also a glob expression (man 7 glob). Thus the command
gcc -MM "$i"
will be executed for every .c and .C file, substituting $i for each file. Then we capture the combined output from these commands into the file makefile.dep.
The next line tells make to include makefile.dep as part of the current Makefile. This is where the problem kicks in. Make first loads and parses the entire Makefile, thus including makefile.dep, before actually processing any rules. Now, I suppose you can see that when makefile.dep gets updated, it is already included. According to the info pages, this should cause make to "abort" and restart, causing the updated makefile.dep to be loaded. I sometimes suspect this is not the case, but it is still better than not having this in at all.
4.2.8 Concluding on Makefiles
That should give you a great head start on Makefiles. This is by no means a complete guide, even though it covers practically everything I have ever used. There are other nice tricks like
glfont.o : override cflags+=$(shell freetype-config --cflags)
Which will cause the command freetype-config --cflags to be executed and it's output made part of the cflags variable whilst compiling glfont.o. Also the += specifies that it should be appended to the existing cflags variable instead of merely discarding the existing value as would happen with =. The override keyword also has special meaning in this context.
So where can you find more information on this, and other features of GNU make?
info make
should tell you all you need to know. Enjoy Makefiles -- they truly make your life easier.
to see the original Source, click here
Sunday, October 05, 2008
Burning ISO files on Linux
You think you need to worry about a lot of copyrights and money and installing softwares like windows to burn an ISO file on a CD/DVD. Well if you have Linux you are wrong. Follow the tutorial and in 10 seconds you start burning your ISO file.
How to burn iso files on Ubuntu Linux.
1. Download the file.
2.Right click on the file and click on Write to Disc...
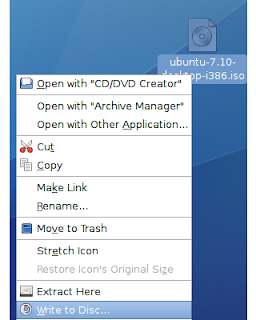 3.In Write To Disc screen you choose your CD Burner and Write speed and when you are done just click on Write
 Source
How to burn iso files on Ubuntu Linux.
1. Download the file.
2.Right click on the file and click on Write to Disc...
 3.In Write To Disc screen you choose your CD Burner and Write speed and when you are done just click on Write
 Source
Tuesday, September 23, 2008
C Manual Pages in Ubuntu
To get a manual over C statements in Ubuntu, you have to run these commands in the terminal :
sudo apt-get install build-essential gcc-3.3-doc c-cpp-reference
apt-cache search gcc|grep doc
sudo apt-get install manpages-posix
sudo apt-get install manpages-posix-dev
sudo apt-get install build-essential gcc-3.3-doc c-cpp-reference
apt-cache search gcc|grep doc
sudo apt-get install manpages-posix
sudo apt-get install manpages-posix-dev
Tuesday, September 09, 2008
Command Line Arguments, C programming
Command Line Arguments
C provides a fairly simple mechanism for retrieving command line parameters entered by the user. It passes an argv parameter to the main function in th e program. argv structures appear in a fair number of the more advanced library calls, so understanding them is useful to any C programmer.
C provides a fairly simple mechanism for retrieving command line parameters entered by the user. It passes an argv parameter to the main function in th


Enter the following code and compile it:
In this code, the main program accepts two parameters, argv and argc. The argv parameter is an array of pointers to string that contains the parameters entered when the program was invoked at the UNIX command line. The argc integer contains a count of the number of parameters. This particular piece of code types out the command line parameters. To try this, compile the code to an executable file named aaa and type aaa xxx yyy zzz. The code will print the command line parameters xxx, yyy and zzz, one per line.
The char *argv[] line is an array of pointers to string. In other words, each element of the array is a pointer, and each pointer points to a string (technically, to the first character of the string). Thus, argv[0] points to a string that contains the first parameter on the command line (the program's name), argv[1] points to the next parameter, and so on. The argc variable tells you how many of the pointers in the array are valid. You will find that the preceding code does nothing more than print each of the valid strings pointed to by argv.
Because argv exists, you can let your program react to command line parameters entered by the user fairly easily. For example, you might have your program detect the word help as the first parameter following the program name, and dump a help file to stdout. File names can also be passed in and used in your fopen statements.
Source : http://computer.howstuffworks.com/c38.htm
Sunday, September 07, 2008
Setting up Persian language in Ubuntu
For viewing Persian alphabet in Ubuntu, you can simply install the package called "msttcorefonts".
Code:
Code:
setxkbmap -option grp:switch,grp:shift_toggle,grp_led:scroll us,ir &
If it works then you just need to have this line executed everytime you login (for example have it in a script that will be run in your profile or in your Autorun)
Source : http://ubuntuforums.org/showthread.php?t=198188
Wednesday, September 03, 2008
install C/C++ on your Ubuntu, HOWTO
If you are a developer you need C and C++ Compiler for your development work.In ubuntu you can install the build-essential for C and C++ compilers.
Install C and C++ Compilers in Ubuntu
sudo aptitude install build-essential
This will install all the required packages for C and C++ compilers
Testing C and C++ Programs
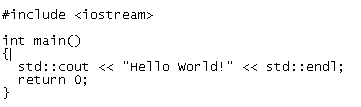
Compiling Your first C Programs
Now you need to open first.c file
sudo gedit first.c
add the following lines save and exit the file

Firstly compile the code using the following command
cc -c first.c
that would produce an object file you may need to add to the library.
then create an executable using the following command
cc -o first first.c
Now run this executable using the following command
./first
Output should show as follows
Hello, world
Compiling your first C++ program
If you want to run c++ program follow this procedure
g++ is the compiler that you must use.
you should use a .cpp file extension rather than a .c one
You need to create a file
sudo gedit first.cpp
add the following lines save and exit the file
Run your C++ Program using the following command
g++ first.cpp -o test
./test
Output should show as follows
Hello World!
Source : http://www.ubuntugeek.com/how-to-install-c-and-c-compilers-in-ubuntu-and-testing-your-first-c-and-c-program.html
How to install VLC media player on Ubuntu
You need to check that a "universe" mirror is listed in your /etc/apt/sources.list.
   % sudo apt-get update
 % sudo apt-get install vlc vlc-plugin-esd mozilla-plugin-vlc
How to change the root password in Ubuntu
In Linux (and Unix in general), there is a superuser named root. The Windows equivalent of root is Administrator. The superuser can do anything and everything, and thus doing daily work as the superuser can be dangerous. You could type a command incorrectly and destroy the system. Ideally, you run as a user that has only the privileges needed for the task at hand. In some cases, this is necessarily root, but most of the time it is a regular user.
By default, the root account password is locked in Ubuntu. This means that you cannot login as root directly or use the su command to become the root user. However, since the root account physically exists it is still possible to run programs with root-level privileges. This is where sudo comes in - it allows authorized users (normally "Administrative" users; for further information please refer to AddUsersHowto) to run certain programs as root without having to know the root password.
This means that in the terminal you should use sudo for commands that require root privileges; simply prepend sudo to all the commands you would normally run as root. For more extensive usage examples, please see below. Similarly, when you run GUI programs that require root privileges (e.g. the network configuration applet), use graphical sudo and you will also be prompted for a password (more below). Just remember, when sudo asks for a password, it needs YOUR USER password, and not the root account password.BUT anyway, if you really want to make the root user, you can do as followed :
To manually set a password for the root user, type in the following in the shell:sudo passwd
After that you are asked to type in the new root password twice. Finally, your root user has its own password.
Logging in as another user
Please don't use this to become root, see further down in the page for more information about that.
sudo -i -u username
sudo -i -u username
For example to become the user amanda for tape management purposes.
sudo -i -u amandaThe password being asked for is your own, not amanda's.
Subscribe to:
Posts (Atom)