To get a manual over C statements in Ubuntu, you have to run these commands in the terminal :
sudo apt-get install build-essential gcc-3.3-doc c-cpp-reference
apt-cache search gcc|grep doc
sudo apt-get install manpages-posix
sudo apt-get install manpages-posix-dev
Tuesday, September 23, 2008
Tuesday, September 09, 2008
Command Line Arguments, C programming
Command Line Arguments
C provides a fairly simple mechanism for retrieving command line parameters entered by the user. It passes an argv parameter to the main function in th e program. argv structures appear in a fair number of the more advanced library calls, so understanding them is useful to any C programmer.
C provides a fairly simple mechanism for retrieving command line parameters entered by the user. It passes an argv parameter to the main function in th


Enter the following code and compile it:
In this code, the main program accepts two parameters, argv and argc. The argv parameter is an array of pointers to string that contains the parameters entered when the program was invoked at the UNIX command line. The argc integer contains a count of the number of parameters. This particular piece of code types out the command line parameters. To try this, compile the code to an executable file named aaa and type aaa xxx yyy zzz. The code will print the command line parameters xxx, yyy and zzz, one per line.
The char *argv[] line is an array of pointers to string. In other words, each element of the array is a pointer, and each pointer points to a string (technically, to the first character of the string). Thus, argv[0] points to a string that contains the first parameter on the command line (the program's name), argv[1] points to the next parameter, and so on. The argc variable tells you how many of the pointers in the array are valid. You will find that the preceding code does nothing more than print each of the valid strings pointed to by argv.
Because argv exists, you can let your program react to command line parameters entered by the user fairly easily. For example, you might have your program detect the word help as the first parameter following the program name, and dump a help file to stdout. File names can also be passed in and used in your fopen statements.
Source : http://computer.howstuffworks.com/c38.htm
Sunday, September 07, 2008
Setting up Persian language in Ubuntu
For viewing Persian alphabet in Ubuntu, you can simply install the package called "msttcorefonts".
Code:
Code:
setxkbmap -option grp:switch,grp:shift_toggle,grp_led:scroll us,ir &
If it works then you just need to have this line executed everytime you login (for example have it in a script that will be run in your profile or in your Autorun)
Source : http://ubuntuforums.org/showthread.php?t=198188
Wednesday, September 03, 2008
install C/C++ on your Ubuntu, HOWTO
If you are a developer you need C and C++ Compiler for your development work.In ubuntu you can install the build-essential for C and C++ compilers.
Install C and C++ Compilers in Ubuntu
sudo aptitude install build-essential
This will install all the required packages for C and C++ compilers
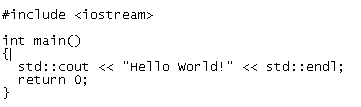
Testing C and C++ Programs
Compiling Your first C Programs
Now you need to open first.c file
sudo gedit first.c
add the following lines save and exit the file

Firstly compile the code using the following command
cc -c first.c
that would produce an object file you may need to add to the library.
then create an executable using the following command
cc -o first first.c
Now run this executable using the following command
./first
Output should show as follows
Hello, world
Compiling your first C++ program
If you want to run c++ program follow this procedure
g++ is the compiler that you must use.
you should use a .cpp file extension rather than a .c one
You need to create a file
sudo gedit first.cpp
add the following lines save and exit the file
Run your C++ Program using the following command
g++ first.cpp -o test
./test
Output should show as follows
Hello World!
Source : http://www.ubuntugeek.com/how-to-install-c-and-c-compilers-in-ubuntu-and-testing-your-first-c-and-c-program.html
How to install VLC media player on Ubuntu
You need to check that a "universe" mirror is listed in your /etc/apt/sources.list.
   % sudo apt-get update
 % sudo apt-get install vlc vlc-plugin-esd mozilla-plugin-vlc
How to change the root password in Ubuntu
In Linux (and Unix in general), there is a superuser named root. The Windows equivalent of root is Administrator. The superuser can do anything and everything, and thus doing daily work as the superuser can be dangerous. You could type a command incorrectly and destroy the system. Ideally, you run as a user that has only the privileges needed for the task at hand. In some cases, this is necessarily root, but most of the time it is a regular user.
By default, the root account password is locked in Ubuntu. This means that you cannot login as root directly or use the su command to become the root user. However, since the root account physically exists it is still possible to run programs with root-level privileges. This is where sudo comes in - it allows authorized users (normally "Administrative" users; for further information please refer to AddUsersHowto) to run certain programs as root without having to know the root password.
This means that in the terminal you should use sudo for commands that require root privileges; simply prepend sudo to all the commands you would normally run as root. For more extensive usage examples, please see below. Similarly, when you run GUI programs that require root privileges (e.g. the network configuration applet), use graphical sudo and you will also be prompted for a password (more below). Just remember, when sudo asks for a password, it needs YOUR USER password, and not the root account password.BUT anyway, if you really want to make the root user, you can do as followed :
To manually set a password for the root user, type in the following in the shell:sudo passwd
After that you are asked to type in the new root password twice. Finally, your root user has its own password.
Logging in as another user
Please don't use this to become root, see further down in the page for more information about that.
sudo -i -u username
sudo -i -u username
For example to become the user amanda for tape management purposes.
sudo -i -u amandaThe password being asked for is your own, not amanda's.
Sunday, August 31, 2008
Deleting stuffs via Linux Terminal
Deleting folder via terminal
Deleting files via terminal
To delete a folder and its entire contents:
*** BUT PLEASE BE CAREFULL
Code:
sudo rm -rf (folder_name)
Deleting files via terminal
Code:
rm (filename)
Thursday, July 31, 2008
Remote Desktop from Ubuntu to windows XP
Well I believe this is some kind of very cool stuff. While you have the very stability of Linux, now you are able to use remote desktop to connect to a windows to use windows world advantages as well. The point is to have Terminal Server Client. The only thing you do choose Terminal Server Client 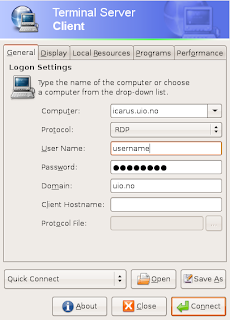 from Application > Internet, and then type in your destination computer address ( or remote desktop server at university or somewhere), username & password , ...
Some tips : If you are connecting to a PC, make sure the Remote Desktop is enabled on your PC. Basically, right click on My Computer, click Properties. Choose the Remote tab, and click the check box for Remote Desktop. Then go to Windows firewall and add an exemption for Remote Desktop, if it didn't already. If you have a Symantec firewall or something else, make sure to open the port there instead!
Then use the Terminal Server Client in Ubuntu and give it the XP machine's IP address. Choose RDP as the protocol.
 from Application > Internet, and then type in your destination computer address ( or remote desktop server at university or somewhere), username & password , ...
Some tips : If you are connecting to a PC, make sure the Remote Desktop is enabled on your PC. Basically, right click on My Computer, click Properties. Choose the Remote tab, and click the check box for Remote Desktop. Then go to Windows firewall and add an exemption for Remote Desktop, if it didn't already. If you have a Symantec firewall or something else, make sure to open the port there instead!
Then use the Terminal Server Client in Ubuntu and give it the XP machine's IP address. Choose RDP as the protocol.
Friday, July 18, 2008
How to forward an URL to another website
Redirecting with HTTP-EQUIV Refresh
The "Refresh" HTTP-EQUIV meta-tag allows you to specify a timeout and a new page to load once that timeout has expired. To use it add the following to the HTML of the page line between the and sections:

Note:
The timeout (shown here as 5) is in seconds.
Be sure to change the URL to that of the desired page.
Insert double quotes exactly as shown.
Copy or makea back up of your thunderbird emails and addresses
All your emails, contacts, filters, settings and what not in one place — Mozilla Thunderbird — are great, but in two places they are even better. This is true in particular if that other place is a shiny new computer emitting the certain new laptop smell. Fortunately, copying all your Mozilla Thunderbird data is easy.
You may have noticed that I did not mention backups yet. This is because you need a backup when you have lost your data — and you won't lose your data. But, of course, you can (and should) create backup copies of your Mozilla Thunderbird profile by copying it.
Back Up or Copy Your Mozilla Thunderbird Profile (Email, Settings,...)
To copy your Mozilla Thunderbird profile:
* Make sure Mozilla Thunderbird is not running.
* Open your Mozilla Thunderbird profile directory.
* Highlight all files and folders in it.
* Copy the files to the desired backup location.
o You can compress the files and folders to a zip file and move the zip file instead.
Now you can restore the profile on another computer, or when problems arise.
How to get a back up of bookmarks in Firefox
I make regular backups of my Internet Explorer favorites which are placed in a folder named "Favorites" inside the user profile. In IE for every entry added to the favorites an Internet Shortcut (*.url) is created so the backup is actually a container of files with the url extension. Now that I am switching to FireFox it is important to keep my backup schedule but FireFox is using a different mechanism to store bookmarks! Instead of creating an entry for every bookmark it uses a single HTML file to hold the entire bookmarks and this HTML file is located in the user profile:

Source : http://www.itbuzzer.net/corner/2004/07/how-to-backup-firefox.asp
"Drive:\Documents and Settings\username\Application Data\Mozilla\Firefox\Profiles\default.qfb\bookmarks.html"So by backing up "bookmarks.html" I will have my backup in place again and FireFox gives me the ability to search through my Bookmarks by keeping all the entries in this HTML format.
Source : http://www.itbuzzer.net/corner/2004/07/how-to-backup-firefox.asp
Wednesday, July 09, 2008
What is a DMS-59 ?
Well it took me a while to find out what the hell this port is @ work but I post it here, so it might helps others and prevent wasting of time ...
Wiki describes DMS-59 as followed :
Wiki describes DMS-59 as followed :
DMS-59 is a 59-pin electrical connector generally used for computer video cards. It provides two DVI outputs on a single connector. An adapter cable is needed for conversion from DMS-59 to DVI or VGA, and different types of adapter cables exist. The connector is four pins high and 15 pins wide, with a single pin missing from the top row, in a D-shaped shell, with thumbscrews.
The application for DMS-59 is to support a higher density of video displays, in a similar amount of connector space to a DVI connector. DMS-59 supports two DVI Dual Link digital channels or two VGA analog channels from a single connector. The compact size lets a half-height card support two high resolution displays, and a full-height card (with two DMS-59 connectors) up to four high resolution displays.
The DMS-59 connector is used by ATI, NVIDIA, and Matrox for video cards sold in Lenovo Thinkcentres, Viglen Genies and Omninos, Dell, HP, and Sun computers. Some confusion has been caused by the fact that vendors label cards with DMS-59 as "supports DVI", but the cards do not have DVI connectors built-in. Such cards, when equipped with only the VGA connector adapter cable, cannot be connected to a monitor with only a DVI-D input. A DMS-59 to DVI adapter cable needs to be used with such monitors.
The DMS-59 connector is derived from the Molex Low Force Helix connector, which can also be found on some (presumably earlier) graphics cards. These ports are similar to the DMS-59 port, but have all 60 pins present, whereas DMS-59 has one pin (pin 58) blocked. You cannot put a connector plug with all 60 pins (such as a Molex 88766-7610 DVI-I splitter) into a properly keyed DMS-59 socket.
The photo is taken from wikipedia.
9th of July 2008 - 10:30
Source : Wikipedia
Tuesday, May 20, 2008
Different screen ports ...

The Digital Visual Interface (DVI) is a video interface standard designed to maximize the visual quality of digital display devices such as flat panel LCD computer displays and digital projectors. It was developed by an industry consortium, the Digital Display Working Group (DDWG). It is designed for carrying uncompressed digital video data to a display. It is partially compatible with the High-Definition Multimedia Interface (HDMI) standard in digital mode (DVI-D).
More info Wikipedia
Thursday, February 07, 2008
Disabling the User Account Control status warning message
To disable the User Account Control status warning message:
- Use a registry editing tool ( Start - write : regedit ) to navigate to the following key:
HKEY_LOCAL_MACHINE\SOFTWARE\Microsoft\Security Center
- Add the following value:Data Type:DWORDValue Name:UACDisableNotifyValue:1
- Restart the Security Center service for the change to take effect.
How can I disable the User Account Control (UAC) feature on my Windows Vista computer?
Windows Vista has the built-in ability to automatically reduce the potential of security breeches in the system. It does that by automatically enabling a feature called User Account Control (or UAC for short). The UAC forces users that are part of the local administrators group to run like they were regular users with no administrative privileges.
Read more about UAC here: What's User Account Control in Windows Vista?
Although UAC clearly improves the security on Windows Vista, under some scenarios you might want to disable it, for example when giving demos in front of an audience (demos that are not security related, for example). Some home users might be tempted to disable UAC because of the additional mouse clicking it brings into their system, however I urge them not to immediately do so, and try to get used to it instead.
Anyway, if required, you can disable UAC by using one of the following methods:
Method #1 - Using MSCONFIG
-
Launch MSCONFIG by from the Run menu.
-
Click on the Tools tab. Scroll down till you find "Disable UAP" (this should probably change to UAC in next Vista beta builds and in the RTM version). Click on that line.

-
Press the Launch button.
-
A CMD window will open. When the command is done, you can close the window.
-
Close MSCONFIG. You need to reboot the computer for changes to apply.
Note that you can re-enable UAC by selecting the "Enable UAP" line and then clicking on the Launch button.
Method #2 - Using Regedit
-
Open Registry Editor.
-
In Registry Editor, navigate to the following registry key:
-
Locate the following value (DWORD):
EnableLUA
and give it a value of 0.
Note: As always, before making changes to your registry you should always make sure you have a valid backup. In cases where you're supposed to delete or modify keys or values from the registry it is possible to first export that key or value(s) to a .REG file before performing the changes.

-
Close Registry Editor. You need to reboot the computer for changes to apply.
In order to re-enable UAC just change the above value to 1.
Method #3 - Using Group Policy
This can be done via Local Group Policy or via Active Directory-based GPO, which is much more suited for large networks where one would like to disable UAC for many computers at once.
If using Local Group Policy you'll need to open the Group Policy Editor (Start > Run > gpedit.msc) from your Vista computer.
If using in AD-based GPO, open Group Policy Management Console (Start > Run > gpmc.msc) from a Vista computer that is a member of the domain. In the GPMC window, browse to the required GPO that is linked to the OU or domain where the Vista computers are located, then edit it.
In the Group Policy Editor window, browse to Computer Configuration > Windows Settings > Security Settings > Local Policies > Security Options.

In the right pane scroll to find the User Access Control policies (they're down at the bottom of the window). You need to configure the following policies:

You'll need to reboot your computers.
Method #4 - Using Control Panel
-
Open Control Panel.
-
Under User Account and Family settings click on the "Add or remove user account".

-
Click on one of the user accounts, for example you can use the Guest account.
-
Under the user account click on the "Go to the main User Account page" link.

-
Under "Make changes to your user account" click on the "Change security settings" link.

-
In the "Turn on User Account Control (UAC) to make your computer more secure" click to unselect the "Use User Account Control (UAC) to help protect your computer". Click on the Ok button.

-
You will be prompted to reboot your computer. Do so when ready.

In order to re-enable UAC just select the above checkbox and reboot.
Tuesday, January 29, 2008
Moving messages from Thunderbird to Outlook Express and Outlook

| Even though Mozilla Thunderbird is a fantastic email client, there are people who (for one reason or another) need to switch back to Microsoft Outlook Express (OE) or Outlook. However, Thunderbird still doesn't have an "Export" feature which would export mail archives in a format understandable by OE or Outlook. IMAPSize can be of great help in this process and this page explains how to perform the migration. Mozilla Thunderbird stores emails in the mbox format. Outlook Express stores email messages in propriatory *.dbx files but understands *.eml, which are plain text files. MS Outlook stores messages in *.pst files which are binary propriatory (Microsoft) files. Here are the steps you have to take: 1. Compact your Thunderbird folders (optional) Thunderbird keeps messages in mbox files even after they have been deleted. If you don't want to include deleted messages in the conversion, you have to compact your folders in Thunderbird. Right click a folder and select "Compact This Folder". This will completely remove deleted messages from the folders mbox file. 2. Locate mbox files in Thunderbird Thunderbird stores messages in the Profile Folder, in the Mail and (if you use IMAP) ImapMail folders. Each mail folder (Inbox, Sent, etc.) is stored as two files — one with no extension (e.g. INBOX), which is the mail file itself (in "mbox" format), and one with an .msf extension (e.g. INBOX.msf), which is the index (Mail Summary File) to the mail file. 3. Convert mbox files to eml files IMAPSize has a built-in mbox2eml tool that can seemlesly convert thousands and thousands of messages. Download, install and run IMAPSize (it's free) and invoke the mbox2eml option from the Tools menu. Select the mbox file you wish to convert (you might need to set the "Files of type" option to "All Files" in the file selection dialog, since Thunderbird mbox files don't have an extension) and select a location where generated eml files should be stored. Click "Convert" and IMAPSize will start converting the files. All the attachments will also be converted and your original Thunderbird files will not be touched. Starting from version 0.2.0. you can convert multiple mbox files at once. 4. Import generated eml files into Outlook Express Launch Outlook Express and select the local folder (or create a new one) into which you want to import your messages. Open Windows Explorer or your favourite file manager, locate the generated eml files, select them and drag and drop them into the OE application window. If Outlook Express is your email client of choice you don't have to perform the next step. 5. Export files from OE to Outlook Assuming you have Outlook installed on your system, open Outlook Express and from the File menu select Export/Messages. Once exported, the messages will appear in Outlook - if they were in your inbox in OE, they'll be added to your Outlook inbox; if they were in a local subfolder in OE, a folder of the same name will be created under your Outlook inbox. If you stumble upon any problems feel free to report them on the forum or email to imapsize at broobles dot com. If you are looking for a good text editor to inspect your mbox files, check out this list of best text editors. Source : http://www.broobles.com/imapsize/th2outlook.php |
Monday, January 07, 2008
How to install the RealPlayer (Multimedia Player)
A little bit Linux info, I post all the information that I find useful for myself while being a newbie to Ubuntu ( LINUX ), so this is how to install realplayer on Ubuntu. Enjoy it ... Source mentioned at the end.
Download the Realplayer .bin file from http://www.real.com/linux Im
Installation Instructions - Ensure that the .bin file you downloaded is executable. You can make the .bin file executable by running the
"chmod a+x RealPlayer10GOLD-Linux.bin" ( file name can change during different versions plus always you can use TAB button to auto complete your commands. Like you just write R and then press TAB button and linux will complete it for you )
after running the command from a terminal window. - Run the .bin file by typing "./RealPlayer10GOLD-Linux.bin"
Enjoy Realplayer :-)
Source : http://www.ubuntux.org/how-to-install-the-realplayer-multimedia-player
How to change grub boot order in Linux
First of all run this command in shell :
and then you get a text file with such a text in it as followed :
sudo gedit /boot/grub/menu.lst
and then you get a text file with such a text in it as followed :
Easily Set Default OS in a Windows Vista and XP Dual-boot Setup
If you are running a dual-boot setup with more than one Windows operating system, It's pretty easy to configure the default boot operating system with the GUI interface. Note that if you are using Windows Vista as one of the operating systems, you will need to make this change from Vista, not XP.
First, you'll need to right click on Computer and select Properties:

Next, click Advanced System Settings

Now click on the Settings button under Startup and Recovery

And just select the operating system you want to use:

PLAN B : bcedit command from command prompt
When you install Windows Vista as a dual-boot with your regular Windows XP partition, Vista is always set as the default OS. If you want to set XP as the default OS instead, there's a quick command you can run to change it back.
First you'll have to open an administrator command prompt. Type cmd into the search box, and then hit Ctrl+Shift + Enter to open it in administrator mode. You should be prompted for the UAC dialog.

Enter in the following command:
bcdedit /default {ntldr}
Example:
C:\Windows\system32>bcdedit /default {ntldr}
The operation completed successfully.
Now when you reboot, it will set XP as the default.
Source :
http://www.howtogeek.com/howto/windows-vista/easily-set-default-os-in-a-windows-vista-and-xp-dual-boot-setup/
Subscribe to:
Posts (Atom)