Showing posts with label internet. Show all posts

Tuesday, March 08, 2022

Having problem with post preview in Linkedin? Titles or images do not update? read here

 Having problem with post preview in Linkedin? Titles or images do not update? well this post can help you.

Linkedin has a debugging tool called post inspector which is quite easy to use. Simply insert your link there and it will update the "cache" that Linkedin keeps on your link

https://www.linkedin.com/post-inspector/


Tuesday, July 03, 2012

Sharing your WiFi Internet through the Ethernet port, Windows 7


1- Connect to the Internet (using WiFi)

2- Press Start button, Control Panel, Network and Internet, Network and Sharing Center, Change Adapter Settings from the list on the left side.

3- Right-click your wireless connection and select Properties.

4- On Sharing tab check in the check-box "Allow other network users to connect through this computer's Internet connection."

5- Check "Allow other network users to control or disable the shared Internet connection" check-box as well and press Ok.

6- Plugin the ethernet cable to your computer and the other side to another computer or an ethernet switch / router.

Sunday, August 07, 2011

Error importing SQL database in Wordpress

If you get; CREATE TABLE IF NOT EXISTS ; error, when you try to import your SQL backup into your newly installed Wordpress, then you just need to export your database again(at your old PhpMyAdmin section) and while doing it, dont forget to tick DROP all WordPress tables, when you export your SQL database.

Restoring SQL database in your new wordpress

  1. You make a back up file of your SQL database from your Cpanel -> PhpMyAdmin -> Export*** You need to DROP all WordPress tables in your database to make room for the restore(This is a check box when you are exporting your DB).
  2. You upload the file in your new hosting plan/new website on your Cpanel -> PhpMyAdmin -> Import
  3. Blank page ??? Check your themes. Faulty theme can cause blank page. Try changing to another theme.

Saturday, March 12, 2011

"Fatal error: Call to undefined function" after automatic upgrade in Wordpress

"Fatal error: Call to undefined function" is always a sign of an incomplete upgrade, where not all the files got upgraded.

Thursday, January 13, 2011

String & Javascript

String in Javascript, cool link : http://www.javascriptkit.com/javatutors/string4.shtml

Javascript, forward to another page according to the refferer URL

<!-- Hide script from old browsers<br>

if (document.referrer.indexOf("facebook") != -1)
//document.write("From facebook")
location.href = "www.yourpage.com";
else
document.write("Not from facebook so we stay on this page")
//-- Stop hiding script -->

Thursday, January 06, 2011

HOWTO : The code which lets you share a link on Facebook on your website

If you want to share the link of a current page on your website or a permanent link on Facebook, you just need to do the following :

Facebook has a very good documentation on it which you can read here.

</SCRIPT> <a name="fb_share" type="button"></a> <script src="http://static.ak.fbcdn.net/connect.php/js/FB.Share"
type="text/javascript">
</script>

Result :

Wednesday, January 05, 2011

HOWTO : insert a code in blogspot weblogs


<"border: 1px dashed rgb(153, 153, 153); padding: 5px; overflow: auto; font-family: Andale Mono,Lucida Console,Monaco,fixed,monospace; color: rgb(0, 0, 0); background-color: rgb(238, 238, 238); font-size: 12px; line-height: 14px; width: 100%>

Some code here

Sunday, January 02, 2011

Setting limitation on uploading file, PHP

You can always set limitations on the uploading process as it is a big security risk to let users upload whatever they like ...
<?php
if ((($_FILES["file"]["type"] == "image/gif")
|| ($_FILES["file"]["type"] == "image/jpeg")
|| ($_FILES["file"]["type"] == "image/pjpeg"))
&& ($_FILES["file"]["size"] < 20000))
  {
  if ($_FILES["file"]["error"] > 0)
    {
    echo "Error: " . $_FILES["file"]["error"] . "<br />";
    }
  else
    {
    echo "Upload: " . $_FILES["file"]["name"] . "<br />";
    echo "Type: " . $_FILES["file"]["type"] . "<br />";
    echo "Size: " . ($_FILES["file"]["size"] / 1024) . " Kb<br />";
    echo "Stored in: " . $_FILES["file"]["tmp_name"];
    }
  }
else
  {
  echo "Invalid file";
  }
?>

More detailed types of files : 
"application/pdf" - PDF Files
"application/msword" - MS Word Files
"application/powerpoint" - MS Powerpoint Files
"application/excel" - MS Excel Files
"text/plain" - Text Files


Source : W3Schools

Uploading a file, PHP

With PHP you have the power to upload files to the server.


An example code(The client side) :
<html>
<body>

<form action="upload_file.php" method="post"
enctype="multipart/form-data">
<label for="file">Filename:</label>
<input type="file" name="file" id="file" />
<br />
<input type="submit" name="submit" value="Submit" />
</form>
</body>
</html>


In the HTML code above :

  • The enctype attribute of the tag specifies which content-type to use when submitting the form. "multipart/form-data" is used when a form requires binary data, like the contents of a file, to be uploaded
  • The type="file" attribute of the input tag specifies that the input should be processed as a file. For example, when viewed in a browser, there will be a browse-button next to the input field

****
An example for the "server side" script

The "upload_file.php" file contains the code for uploading a file:

<?php
 if ($_FILES["file"]["error"] > 0)
  {
  echo "Error: " . $_FILES["file"]["error"] . "<br />";
  }
else
  {
  echo "Upload: " . $_FILES["file"]["name"] . "<br />";
  echo "Type: " . $_FILES["file"]["type"] . "<br />";
  echo "Size: " . ($_FILES["file"]["size"] / 1024) . " Kb<br />";
  echo "Stored in: " . $_FILES["file"]["tmp_name"];
  }
?>


By using the global PHP $_FILES array you can upload files from a client computer to the remote server.

The first parameter is the form's input name and the second index can be either "name", "type", "size", "tmp_name" or "error". Like this:


  • $_FILES["file"]["name"] - the name of the uploaded file
  • $_FILES["file"]["type"] - the type of the uploaded file
  • $_FILES["file"]["size"] - the size in bytes of the uploaded file
  • $_FILES["file"]["tmp_name"] - the name of the temporary copy of the file stored on the server
  • $_FILES["file"]["error"] - the error code resulting from the file upload

This is a very simple way of uploading files. You better add restrictions on what the user is allowed to upload to your sever. Down here you can also see a code which saves the uploaded file to a physical place on server. If you do not save the file, the temporary file will be deleted after the script ends. It also checks if the file already exist.


<?php
if ((($_FILES["file"]["type"] == "image/gif")
|| ($_FILES["file"]["type"] == "image/jpeg")
|| ($_FILES["file"]["type"] == "image/pjpeg"))
&& ($_FILES["file"]["size"] < 20000))
  {
  if ($_FILES["file"]["error"] > 0)
    {
    echo "Return Code: " . $_FILES["file"]["error"] . "<br />";
    }
  else
    {
    echo "Upload: " . $_FILES["file"]["name"] . "<br />";
    echo "Type: " . $_FILES["file"]["type"] . "<br />";
    echo "Size: " . ($_FILES["file"]["size"] / 1024) . " Kb<br />";
    echo "Temp file: " . $_FILES["file"]["tmp_name"] . "<br />";
    if (file_exists("upload/" . $_FILES["file"]["name"]))
      {
      echo $_FILES["file"]["name"] . " already exists. ";
      }
    else
      {
      move_uploaded_file($_FILES["file"]["tmp_name"],
      "upload/" . $_FILES["file"]["name"]);
      echo "Stored in: " . "upload/" . $_FILES["file"]["name"];
      }
    }
  }
else
  {
  echo "Invalid file";
  }
?>


Source : W3Schools

Wednesday, November 10, 2010

Link(permalink) pages in wordpress to an external link

You want to redirect pages in your wordpress to an external link ? Now there is a plugin which let you do it :-) The good thing about this ability is that you can re-direct the menu items in your website to external links which was something that Wordpress always lacked.

The plugin name is "Page Liks To". You can download it from here, or simply search the name from your Wordpress control panel. The instruction is as follows :


  1. Upload the page-links-to folder to your /wp-content/plugins/ directory
  2. Activate the “Page Links To” plugin in your WordPress administration interface
  3. Create (or edit) a page or a post to have a title of your choosing (leave the content blank)
  4. Down below, in the advanced section, find the Page Links To widget and add a URL of your choosing
  5. Optionally check the boxes to enable link opening in a new browser window, or 302 Moved Temporarily redirects
  6. Save the post or page

Done! Now that post or page will point to the URL that you choose


Source : http://txfx.net/wordpress-plugins/page-links-to/

Monday, October 11, 2010

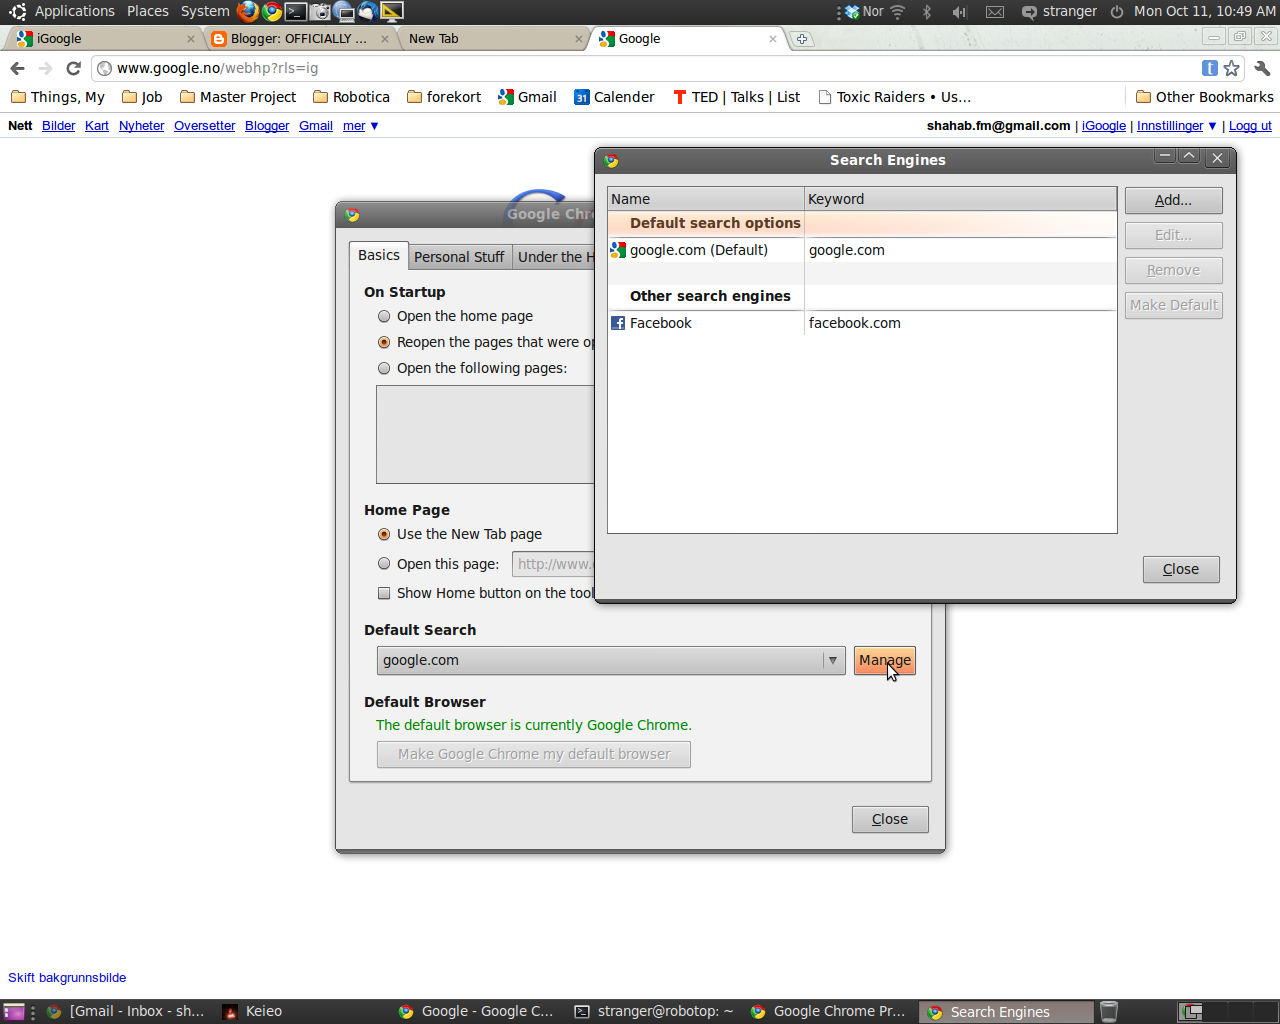
Can't search through google chrome address bar

If this happens to you, then probably your default search engine is NOT chosen. So all you need to do to click on Setting, Preferences, and then Basic, Default search.
The value of default search should be set as Google(or any other search engine you like).

Monday, May 10, 2010

Create your own channel in IRC


You can easily become the operator of your own IRC channel. You can create your own channel by typing /join #channel-name where the channel name doesn't already exist on that network, as in:
/join funfunfun
When you create a channel, you are automatically made the operator of the channel. You can then invite friends across theInternet to join the channel, or wait and see if others join of their own accord.
When you create a channel, you should use the /topic command to specify a one sentence description of the channel's topic. This topic will be displayed to anybody executing a /list command, and may be your best chance to get people to investigate the channel.
/topic #quantum This channel is about einstein
If you need to sign off the channel, or wish to give up operator status, you can assign operator status to someone else with the/op command. You can make more than one person an operator if you want:
/op ivan
/op pierre
/op jane
The /mode command lets you designate a channel that you have created to be secret or private.
/mode #mychannel +s
/mode #mychannel +p
As an operator, you can kick people off.
/kick stupidperson
Source : http://www.livinginternet.com/r/ra_create.htm

Sunday, April 18, 2010

What is CopyGator ?

What is CopyGator ?

This is a free service designed to monitor your RSS feed and find where your content has been republished in the blogosphere. We automatically notify you when a new post of yours is copied to another feed, we also build an overview page you can view to see how/when/where your content is being duplicated, quoted or plagiarized. This is an entirely free service and is powered by the feed spidering power of ://URLFAN. Learn more on how the CopyGator does what he does. or view an example of our content overview page for Gizmodo.com

Wednesday, April 07, 2010

Totally recommended, Ninite

Save your time and use the easiest way to get free apps, all in one file ...

  1. Pick your favorite software.
  2. Start your customized installer.
  3. You're done!

Ninite installs software fast with default settings and says "no" to browser toolbars and other junk.Ninite checks your PC's language and 64-bit support to install the latest, best version of each program.Ninite runs on Windows XP/Vista/7 and works in the background unattended and 100% hands-free.All Ninite does is automatically download and install the  apps you select. Not even Ninite is installed.People use Ninite to install a million apps every month.

Thursday, February 18, 2010

All Internet Explorer users should choose once again if they really want to use IE

It seems Microsoft under press of EU rules is going to publish a madnatory update to ask the users who have Internet Explorer as standard web browser if they want to continue with it. According to Microsoft windows director in Norway there will be a message saying what a web browser is and showing all the alternatives in a random order. The patch is applied to XP, Vista and Widnwos 7.
 source : Digi.no

This is the first time that Microsoft is taking action on EU rules after their update on Windwos 7 for Europe which was distributed without IE as a part of the Windwos core.
Source ( Norwegian ) 

Friday, February 12, 2010

How to remove IE from your Windows

Steps for Windows 7

To uninstall Internet Explorer 8, follow these steps:
  1. Close all programs.
  2. Click Start
    Collapse this imageExpand this image
    Start button
    , and then click Control Panel.
  3. Under Programs, click Uninstall a program.
  4. In the tasks pane, click Turn Windows features on or off.
  5. In the list of windows features, clear the check box next to Internet Explorer 8.
  6. You receive a warning message in a pop-up window. Click Yes.
Internet Explorer 8 will now be uninstalled. The system will restart after the installation.

Steps for Windows Vista or for Windows Server 2008

To uninstall Internet Explorer 8, follow these steps:
  1. Close all programs.
  2. Click Start, and then click Control Panel.
  3. Click Uninstall a Program under the Programs category
  4. In the Tasks pane, click View installed updates.
  5. In the list of installed updates, double-click Windows Internet Explorer 8.

    Note If Windows Internet Explorer 8 does not appear in the list of installed updates, try the alternative steps for Windows Vista or for Windows Server 2008.
  6. In the Uninstall an update dialog box, click Yes.

    Note If you are prompted for an administrator password or for confirmation, type the password, or click Continue.
  7. Follow the instructions to uninstall Internet Explorer 8.
  8. When the uninstall program is finished, restart your computer.
After you have finished, go to the "Did the "Let me fix it myself" steps fix the problem?" section to verify that your earlier version of Internet Explorer is restored.

Steps for Windows XP or for Windows Server 2003

To uninstall Internet Explorer 8, follow these steps:
  1. Close all programs.
  2. Click Start, and then click Control Panel.
  3. Click Add or Remove Programs.
  4. In the list of currently installed programs, click Windows Internet Explorer 8, and then click Remove.

    Note If Windows Internet Explorer 8 does not appear in the list of installed updates, try the alternative steps for Windows XP or for Windows Server 2003.
  5. Follow the instructions to uninstall Internet Explorer 8.
  6. When the uninstall program is finished, restart your computer.

Wednesday, January 13, 2010